Pages

Saturday, November 12, 2016

DIY Toasted Pumpkin Seeds - 3 ways!


Sometimes we all need an excuse to get messy... and carving a pumpkin is the perfect excuse to do that! Who doesn't like squishing pumpkin guts in their hands? As a preschool educator - this could entertain me and my class for hours! 

But wait! After you are done carving your pumpkin - don't throw away all of those perfectly tasty (and healthy!) pumpkin seeds! Toast them! If you have never toasted pumpkin seeds before, here is how you can do it - it's very easy and customizable.

Ingredients:

3 cups pumpkin seeds

Olive oil

2 tablespoons of spice mixture
(here is what I used, but you can make it whatever flavor you like, I like spicy stuff)

Cayenne pepper and Garlic Salt

Tony Chachere's Creole Seasoning 

Taco seasoning (make your own)


Here's What to Do:
Step 1: Rinse pumpkin seeds very well. I also took out any small or malformed seeds.


Step 2: Boil seeds for ten minutes


Step 3: Put 4 tablespoons of olive oil in a bowl with 2 tablespoons of spice mixture and mix well

Taco seasoning

"Nashville Hot" Cayenne pepper and garlic salt

Tony Chachere's Creole Seasoning

Step 4: Let the pumpkin seeds soak in the mixture for an hour (or longer if you want)

I also labeled the aluminum foil with a sharpie so I didn't get the seeds mixed up - but you could just use separate cookie sheets!

Step 5: Bake seeds at 300 degrees for 45 minutes, stirring occasionally so they do not stick together


Finally, you can enjoy crunchy, flavorful pumpkin seeds that don't cost hardly anything to make! Pumpkin seeds love parties and they also make great gifts!


Let me know in the comments below if you have ever toasted pumpkin seeds and what flavor you made/would like to make!

Sunday, October 9, 2016

"Easy Peasy" Peanut Butter Protein Bars


Have you ever wanted to eat a Reese's cup for breakfast but didn't: a) because you didn't have any, and b) because it wasn't the greatest life choice? Well, these chocolate peanut butter protein bars admittedly are not the BEST thing for breakfast - but hey, they are WAY better for you than eating Reese's cups for breakfast and they taste pretty darn close! 

I decided to make these because PROTEIN takes the biggest chunk out of our grocery budget. And while I can't manufacture meat - I was pretty confident that I could make some DIY protein bars! My husband and I wake up at 4:00 am every morning and he has to be at work by 5:00 so we have been buying protein bars to make getting out the door easier/faster. We buy our protein bars at Aldi which are the cheapest we have found for the kind that we like: $3.99 for a box of 6 bars. We buy 2 boxes per week, so that is eight dollars per week - which is almost a third of what we spend on groceries, so I knew it was time to make a change. Unfortunately, I had tried to make my own protein bars in the past but I gave up because they all ended up too goey or tasted "meh." but these taste amazing and are similar in nutrition and consistency to the ones we were already buying at the store. Not to mention they only cost 3.59 to make the whole batch - which comes to only thirty cents per bar!

Now, before you get too excited - these are pretty much just glorified "Rice Krispy" treats with peanut butter and protein powder added. I was inspired the other night when I was making the gooey marshmallow+cereal treats and thinking about how similar they were to protein bars that were made out of rice protein "crisps" (which is the main ingredient of the ones that we usually buy). So I thought, "Why not make "Crispy Rice" protein bars? I am VERY excited about these because they do not fall apart, taste great, and are soy free! They are also SUPER easy to make. Easy peasy - to be exact - and you only need six ingredients to make them!

Here's what you will need:

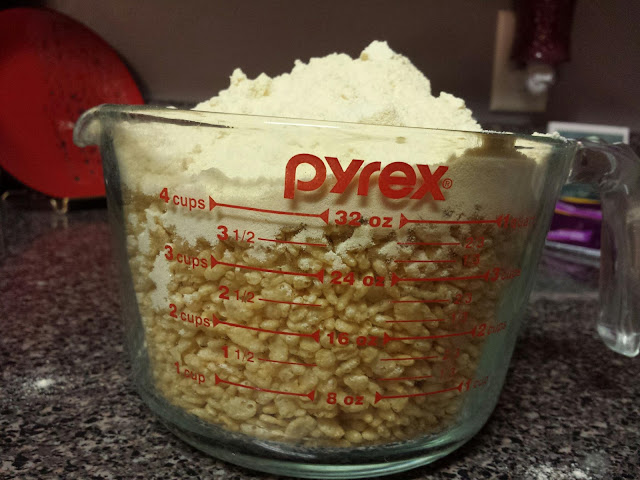
5 cups Crispy Rice cereal

1 cup Vanilla protein powder (we use whey protein - but any protein powder will do)

3 cups peanut butter

1/4 cup honey

2 Tablespoons butter

1 cup milk chocolate chips


Step 1: Melt butter in saucepan over LOW heat (you do not want this to burn - keep it on low the whole time)


Step 2: Add 1/4 cup honey


Step 3: Add 3 cups peanut butter and stir until smooth


Step 4: combine 5 cups cereal and 1 cup protein powder


Step 5: when peanut butter mixture is melted completely - stir until smooth and remove from heat


Step 6: Quickly stir peanut butter into cereal/protein powder mixture until fully incorporated


Step 7: Press mixture into a greased 8"x 8" pan


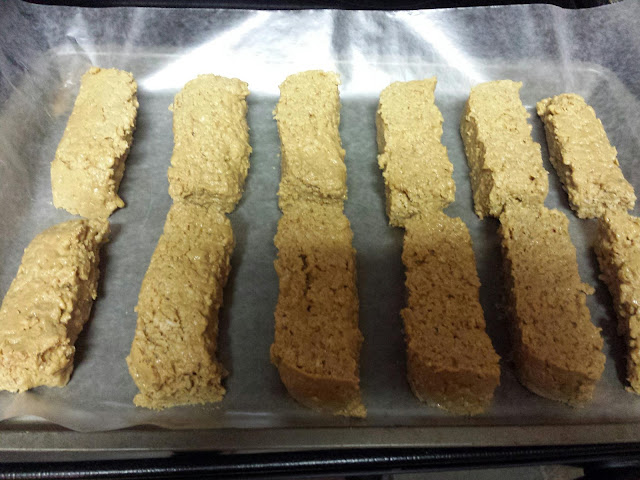
Step 8: allow to cool and cut into 12 "bars"


Step 9: heat 1 cup chocolate chips in microwave in 25 second intervals until completely melted


Step 10: spread a thin layer of melted chocolate onto each bar


Viola! Easy-peasy peanut butter protein bars that taste like a Reese's cup!

Do you have any DIY protein bar recipes? What do you normally eat for breakfast on the go? Please share in the comments below!


Saturday, September 24, 2016

Make this Faux-Graham Cracker Crust with leftover bread!


Have you ever needed a graham cracker crust but didn't have any graham crackers? Well, that is exactly what happened to me the other night! I needed to bring a dessert for a party that I forgot about and I just had to throw something together with what I had (which was not much). 

I had some leftover vanilla ice cream along with a few chocolate and butterscotch chips - so I decided that ice cream pie was the way to go! However, I did not have anything for the pie crust. As I was thinking of a way to make graham cracker pie crust without baking individual homemade graham crackers - it suddenly occurred to me that I could use breadcrumbs (provided that I sweeten them a little bit).

Here are the only three ingredients I used to make this faux-graham cracker pie crust:

5 slices of bread (I used 8 grain whole wheat)

1/4 cup of cinnamon sugar

1/2 cup of melted butter


Make this homemade crust in 5 easy steps:


Step 1: Mix bread and sugar in blender until it resembles coarse crumbs


Step 2: Add melted butter and blend until fully incorporated


Step 3: Press mixture into pie plate


Step 4: Bake at 350 for 30 minutes or until golden-brown


Step 5: Pour pie filling into crust and chill (freeze if ice cream pie)


Enjoy!


Please share in the comments below any homemade dessert recipes you have that can be made in a pinch!

Monday, September 12, 2016

Mom Mondays - Burn calories doing housework!


Something that I have always envied of my mom was her ability to be so... ORGANIZED! I mean, my brain DOES NOT work that way. Now I know that there are certain personalities that tend to be more tidy than others but it is also a learned skill that, as a woman, I admire. 

My mom reflects the attitude expressed in Proverbs 31 through the way she takes care of her home. Proverbs 31:27 says: “She looks well to the ways of her household and does not eat the bread of idleness.”  This is always a convicting verse for me because I very much enjoy "taking it easy" and "letting things slide!" However, there are many benefits to keeping a clean home. Today, I want to focus on calories burned doing chores. (Hey, it's called houseWORK for a reason!) 


It is amazing to me how much people are willing to pay just to burn calories. According to Diet Blog: "gyms are a $700 million industry, and it’s estimated that 12% of the population regularly attend the gym." Gyms as we know them today did not even exist before the 1950's. (Diet Blog) Part of the reason for that is because of the work ethic of the generations preceding us. 

New York Daily News wrote an article titled: "Lack of housework for modern women might be contributing to obesity,"  which I consider extremely plausible. For example: "In 1965, the average women spent nearly 26 hours per week on chores like cooking, cleaning and doing the dishes. Women today allot about half that time for chores." Now, there are obviously MANY other factors that contribute to obesity in the United States, but I would say that this is definitely one of them!

This article piqued my interest as to how many calories one might actually burn doing common household chores. So I did some research (also a little math - ugh!) and created this chart of calories burned per 15 minutes of housework, broken up into categories:


To burn 400 calories, a 150 pound person would need to jog for 1 hour, run for 30 min (at 7.5 min/mile), bike for 1 hour, step aerobics for 45 minutes, general aerobics for 1 hour and 15 minutes, ballet/jazz/tap for 1 hour and a half, or walking (at 4 miles/hour) for 1 and a half hours. (Calorielab)
Wouldn't you much rather kill two birds with one stone and do housework to burn calories? Not only will your house look, smell, and feel beautiful - you will be burning a few extra calories to boot! 


Now, I am writing this mainly to motivate MYSELF to do housework. My number one skill is sleeping, with lounging and puttering coming in at a close second. Third would be... well, I think you get the point: I am a very lazy person and I rather enjoy being lazy. I like to think of myself as a "free spirit." For example, when I walk in the door from work: shoes go to one corner of the living room, my backpack goes to another, and on and on until I finally make it to the couch where I lounge for a few minutes before doing anything. But in the midst of my "lounging" the other day, I was reading a post from Young Wife's Guide called "Managing your Home for God's Glory," when this stopped me dead in my tracks:

"A cluttered home is truly a sign of a cluttered mind."

While I would usually buck at that statement and insist that mess does not bother me - being the "free spirit" that I am - I realized that my mind is often too cluttered for me to remember how to form a sentence properly in English, much less remember anything important! So, I have made it my goal to make my home a more relaxing and creative space by organizing and cleaning. 

Part of my purpose for writing this article is to break things down into manageable chunks as well as have fun! I am very easily bored, so if a task is too repetitive or menial - I usually avoid it altogether. But looking at housework as a means of burning calories - now that is a challenge! Not only do I try to do the work faster so I can burn the most calories possible, but 15 minutes of dishes is a lot easier for me to bite off than "do all the dishes until they are done!" Even though I will end up doing all of them anyway because, "why not? I've come this far!" And 15 minutes of folding clothes is a lot more plausible than doing ALL OF THE LAUNDRY IN THE HOUSE! So, I basically just need to trick myself into doing more housework by thinking of them as mini-workouts!


What ways do you motivate yourself to clean/organize/kick butt around the house? Let me know in the comments below. I am not an organized person so if you have any tips/routines you would like to share... PLEASE HELP ME!!!!!!!!


Sunday, September 4, 2016

Make this DIY deodorant with leftover candle wax!


So I have a confession to make - I love candles! Anytime we have people over I have at least three candles burning: one in the bathroom and two in the living room because we have vaulted ceilings and I am always afraid that the scent is not strong enough and our house will just smell like our dog! In addition to my obsession with burning candles, I never throw them away even if there is only a tiny layer of wax in the bottom. So I have about twelve candles with about an 1/4 inch layer of candle wax left! And today - I finally put that leftover wax to good use - because I am weird and frugal : )


If you are like me, then you love saving money ANY chance you get - even if it is just a few pennies! One of the ways that I save money is to MAKE things instead of buying them. I have actually been avoiding making my own deodorant because all of the DIY recipes that I have seen so far use beeswax (which is expensive) and tea tree oil (which stinks!) and I am not concerned about "going green" or chemicals in my deodorant - I just want to save money! So I googled if you can make deodorant without beeswax and I found this recipe on Mommypotamus that uses only cornstarch, baking soda, and coconut oil. The only problem is, it is more of a paste (because of the liquid nature of coconut oil) and therefore you can't use it as "stick" deodorant. And I would MUCH rather use a stick but I don't want to have to buy beeswax!


So, staring at all of my leftover candle wax jars... I had a beautiful epiphany: why not put all of my unused candle wax to good use? Not only does it smell AMAZING but I figured it would be the perfect ingredient to make some of my own homemade deodorant! Oh, and one more thing, I also want ANTIPERSPIRANT not just deodorant - because I don't just want to smell nice - I prefer not to be dripping non-stinky sweat all day! So, I did a little research and came up with this list of ingredients:

1/4 cup Baking Soda - natural deodorant

1/2 cup Candle Wax - for the scent and to make it firm

1/2 cup Coconut Oil - naturally antifungal and antibacterial

Empty deodorant container - to fill up

Body spray - for the scent

1/2 cup Corn Starch - natural antiperspirant!!


Here's what to do:

1. Melt the 1/2 cup candle wax in a small saucepan on low (Thanks to our lovely cat Rukia - I had a pre-broken jar of candle wax from one of her "ninja kitty" modes - if you are a cat owner you know whereof I speak)


 2. Mix 1/4 cup Baking Soda and 1/2 cup Cornstarch in a small bowl


3. Mix 1/2 cup coconut oil into the baking soda/cornstarch mixture and blend until it becomes a creamy paste (below)


4. Pour the melted wax into a glass pitcher and blend the oil/soda/starch paste with it


5. Add a few squirts of body spray for extra-yummy-smellification and mix well


6. Allow to cool for a few minutes (you don't want it to be too hot or it will melt your plastic container - you also don't want it to be too cold or it will be too thick to pour) and pour into the empty deodorant container


7. Let stand for one hour and your homemade antiperspirant/deodorant is ready to use! (save any leftovers in the fridge and you can melt it and pour it into the empty container the next time you run out)


Boom! DIY deodorant - done!


Also, this picture - because, why not?

Let me know in the comments below if you have any other uses for leftover candle wax or if you have any questions/suggestions concerning DIY deodorant!